[Archived] Video Clipping for Partial File Restore
- Rumena Zlatkova (Deactivated)
- Anjali Tyagi
- Kyle Miller (Deactivated)
Important
This page is archived as it was having an issue while converting it to the new editor. Replaced it with a new page containing the same information.
The Content UI provides viewing and sharing of videos uploaded to a Swarm bucket. Video Clipping, also known as Partial File Restore, is an additional feature available with Docker running on the Gateway server. Video clipping provides the ability to excerpt portions of the video and store them as new, standalone videos within Swarm.
Video Clipping Use Cases
- Sporting Event Analysis
A sporting team uploads the hours-long recording of a recent game into Swarm. It requires key highlights (typically 2 minutes or less) to go to broadcasters, commercial sponsors, or coaches for further consumption. Rather than sending the entire (large) video file with timestamps, the video owner uses the Content UI to extract the relevant segments into small video clips, which are then sent out as needed. - Targeted Post-Production
A media company needs the special post-production work applied to a given scene or set of takes but avoids transmitting the full set of video (multiple GB) to the post-production shop. Instead, the required portion of the video, buffered with a few seconds of video before and after, is extracted into a smaller (measured in MB) clip and sent for processing. - Presentation Highlights
A professional organization uploads the full hour-long conference presentations into Swarm, then creates highlight excerpts to use on the website, on social media, and in marketing materials.
Installing Video Clipping
Video clipping is available on Gateway version 6.3 and later. The following instructions are for Gateway versions 6.3 to 7.7. For version 7.8 and later, the feature is installed with Gateway and requires Docker running on the Gateway server. See Gateway Installation for details regarding Docker and disregard the following installation steps.
For older Gateway versions, obtain the optional stand-alone package for video clipping and install it on Gateway servers with no additional configuration. In addition to the RPM tool, install the supporting framework for multimedia formats i.e. FFmpeg, which Swarm provides preconfigured within a Docker container.
Best practice
Use Docker and install the provided container; this selects the required FFmpeg repo choices, installs dependencies, and makes additional resource changes required to protect Gateway's performance. Installing FFmpeg directly requires additional configuration. It is advised to complete the configuration with DataCore Support.
Copy the package for video clipping to a server that is running Content Gateway.
caringo-videoclipping-VERSION.noarch.rpm- If the server is running RHEL/CentOS 6.x, upgrade to RHEL/CentOS 7 (required by Docker).
- If the server is running Content Gateway 6.0 or earlier, upgrade Gateway (versions 6.1 and higher support drop-in features such as video clipping). See Gateway Installation.
- If Content UI is version 6.1 or earlier, upgrade it to support this feature. See Content UI Installation.
Install the package.
yum install caringo-videoclipping-VERSION.noarch.rpm
The installation creates a features.d directory under
/etc/caringo/cloudgateway/where Gateway detects optional dynamic features.- Install multimedia support via FFmpeg. Swarm provides it preconfigured in a Docker container.
From an Internet-connected machine,Check the Docker is installed.
docker info
Verify Docker by running a container test.
docker run hello-world
Load the provided container for FFmpeg.
docker load < caringo-gateway-VERSION.feature.ffmpeg.via.docker.VERSION.x86_64
- Gateway creates
/var/spool/caringo/cloudgateway/featuresdirectory for spooling video clips. Gateway denies starting in absence of the directory. In setting
iptablesrules, Docker closes external TCP access to port 80 (although ping and ssh still work). Explicitly open port 80 again for clients to access Gateway.firewall-cmd --add-port=80/tcp --permanent firewall-cmd --reload systemctl restart docker
- Repeat the above process on any remaining Content Gateway servers.
- Restart the Gateway server(s).
On reboot, Content Gateway detects the feature. On a page refresh, Content UI displays the clipping control for video content.
Creating a Clip
Notes
- Currently, clipping is allowed for named objects. Only one clip can be saved at a time.
- The browser-based tool requires an HTML5-supported video format; MPEG-4/MP4 (H.264) and WebM are tested and supported.
- Video clips are output in MP4 format.
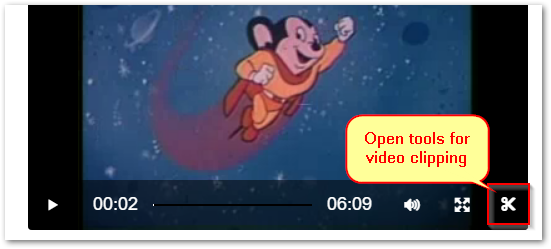
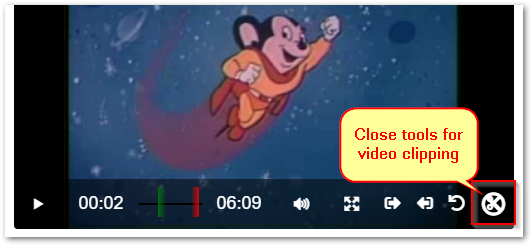
The Content UI adds the scissor  icon to the right of the video control bar on video-format objects with a sufficient number of frames to clip. Check the Gateway installation if the icon does not appear. Selecting the icon toggles the video clipping toolbar open and closed.
Tip
For higher resolution, use Full Screen  mode.
mode.
Three ways to set the time span of the clip. Select a method based on the precision needed:
- Drag the green and red bars
- Select a bar and use the left and right arrow keys to move it frame by frame (supported in Chrome)
- Enter minute:second[:millisecond] values in the Start Time or End Time fields
The default format for Clip Name is {original-name}-{start}-{end}.{filetype} but it can be customized. The clip name dynamically reflects the selected start and end times unless the field contains a custom value. This becomes the object name after selecting Create Clip: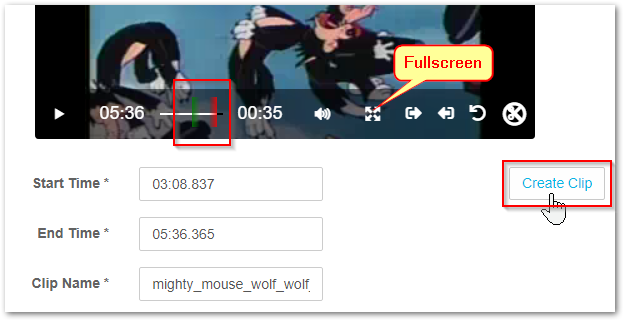
The tool writes the clip to the same bucket as the source video.
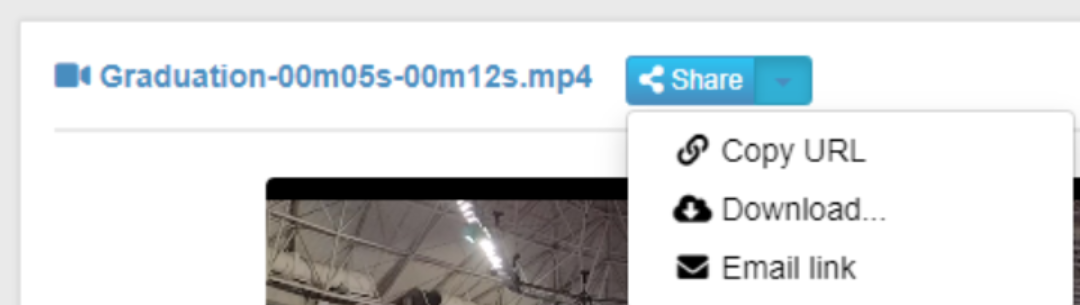
The following shows an example of a clip with the default name beside the original video.
Tips
File format — The fastest clip generation is from source videos available in MP4 format, which matches the clip format generated by Content UI. Clipping from WebM-formatted source videos requires additional transcoding.
Delays in listing — Provide the bucket listing time to update since the process is asynchronous. The JSON file appears in the bucket listing ahead of the clip, especially for large clips that take time to process. The JSON file contains information about the clip and its appearance indicates that the write succeeded. These JSON artifacts have brief lifepoints to enable auto-cleanup, so edit the metadata and delete the lifepoint to retain. See Audit Logs for Clipping, below.
Use the Share menu to distribute the new clip.
Metadata for Clips
Info
The size of the new video clip reflects the selected video range. This clip is a standalone video, not a stub pointing to a range in the original, and therefore no dependency on it.
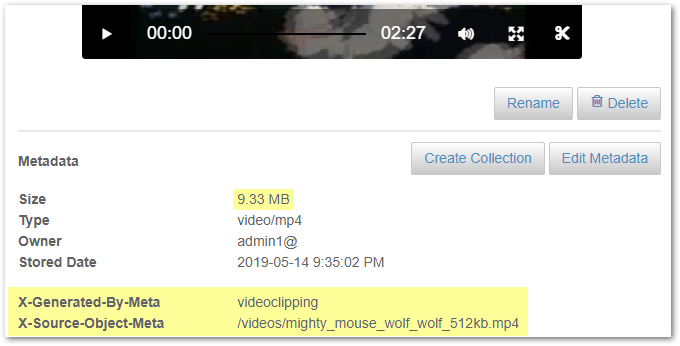
The object is tagged with the following metadata on creation:
- x-owner-meta — The user who initiated the clipping request, not the owner of the source video.
- x-generated-by-meta — The name of the feature that generated the object.
- x-source-object-meta — The SCSP URL (stripped of host and protocol) for the original source object, regardless of it exists in Swarm.
Monitoring Clipping
Implement Swarm's Prometheus Node Exporter and Grafana and install the latest DataCore VideoClipping Dashboard (https://grafana.com/grafana/dashboards?search=caringo) to monitor clipping issues.

Clipping has three distinct stages:
- Preprocessing — Gateway verifies the request is valid before starting any processing. It verifies the following conditions:
- The clipping addon is installed
- The required parameters are set
- The current user has access rights
- Processing — Gateway runs the request, extracts the specified portion of the input, and creates the clip on the local disk.
- Postprocessing — Gateway uploads the clip as a new video object in Swarm. This new video references but has no dependencies on the original.
Identify which stage of errors occurred in the clipping to narrow down the scope of the cause. Check the audit logs for details.
Tip
Preprocessing errors are common and generated from the configuration/authentication errors that are quickly resolved.
Audit Logs for Clipping
Each video clipping event logs multiple operations to provide auditing through the process, which might take a long period. Gateway creates video clips asynchronously to accommodate requests of all sizes and acknowledges the request with an INVOKE message, which appears first in the audit log. The acknowledgment references the future JSON result object. The JSON result displays the outcome of the clipping request as Sucess or Fail, the FFmpeg exit code, and the duration, capturing the same information as if it is synchronous.
2019-08-22 14:32:04,991 INFO [F38143E84D3EC62E] 2 192.168.1.154 192.168.1.154 Feature:videoclipping INVOKE user1 (none) 200 0 149 38.00 d1.example.com bucket1 inputMovie.mp4
2019-08-22 14:32:15,022 INFO [F38143E84D3EC62E] 2 192.168.1.154 192.168.1.154 Feature:videoclipping POST user1 (none) 201 641705 46 0.09 d1.example.com bucket1 outputClip.mp4
2019-08-22 14:32:15,061 INFO [F38143E84D3EC62E] 2 192.168.1.154 192.168.1.154 Feature:videoclipping POST user1 (none) 201 149 46 0.04 d1.example.com bucket1 inputMovie.mp4.F38143E84D3EC62E.json
All JSON result objects are temporary by default and are created with a lifepoint to trigger deletion after 5 days. Change the default in the Gateway Configuration, gateway.cfg ([dynamic_features] resultObjectLifetime=5).
© DataCore Software Corporation. · https://www.datacore.com · All rights reserved.