...
Download the ONTAP Simulator:
Browse to http://mysupport.netapp.com/NOW/download/tools/simulator/ontap/8.X/
Log in or register to the NetApp support.
Download the Simulator itself: download the ESX version, plus the license codes.
Deploy the compressed archive:
Expand the archive.
Upload it to an ESXi datastore using the datastore browser.
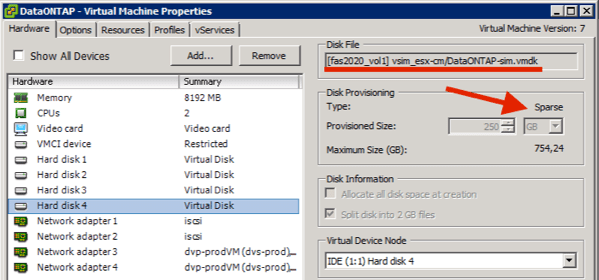
Before the first boot, change the 4th virtual disk of the simulator. This is created as “sparse” and is not supported in ESXi, so it is best to convert the disk to a proper thin format that can be extended in ESXi.
First remove the disk from the powered off virtual machine without deleting it.
At the command line, navigate to the folder where the disk is located and run these commands:
Code Block language bash vmkfstools -i DataONTAP-sim.vmdk thin.vmdk -d thin # Clone the disk into a thin disk vmkfstools -U DataONTAP-sim.vmdk # Deletes the old sparse disk vmkfstools -E thin.vmdk DataONTAP-sim.vmdk # Renames the cloned disk like the original
Use the following if the max number of file descriptors needs to be raised for the first command:
Code Block language bash ulimit -a # to find what exists ulimit -n # to increase; try 1000
After these operations, reconnect the new thin disk to the virtual machine in the same IDE channel.
Before powering on the virtual machine, edit the original 4 network adapters and configure them based on the network.
Power on the VM and run the commands that follow.
When prompted, press
Ctrl+Cfor the Boot Menu.Select 4 ‘Clean configuration and initialize all disks’ and answer ‘
y’ to the two prompts.Wait for the procedure to complete, which reboots the VSA automatically.


At the node setup screen, type
exitto navigate to the prompt.Login with
adminwith no password.Set the password for the admin user:
security login passwordProceed with these commands:
Code Block language bash security login unlock -username diag security login password -username diag # Enter new password twice set -privilege diagnostic # Press y systemshell local # Log in with the unlocked diag user setenv PATH "${PATH}:/usr/sbin" echo $PATH cd /sim/dev/,disks ls (see all the disks listed) sudo rm v0* sudo rm v1* sudo rm ,reservations cd /sim/dev vsim_makedisks -h # Type 36 sudo vsim_makedisks -n 14 -t 36 -a 0 sudo vsim_makedisks -n 14 -t 36 -a 1 sudo vsim_makedisks -n 14 -t 36 -a 2 sudo vsim_makedisks -n 14 -t 36 -a 3 ls ,disks/ # Now have 4 shelves with 14 disks each, all 9 GB exit system node halt localTo accommodate the new disks, the containing vmdk disk needs to be expanded. Because the disk is in IDE format, it cannot be expanded live and requires this process:
Power down the appliance.
Remove the disk from the VM without deleting it.
Edit the .vmdk descriptor file in the command line and change
ddb.adapterTypefrom "ide"to"lsilogic"Add the disk to the VM. Because it is now listed as SCSI, expand the disk to 550GB (to accommodate the additional shelves and disks created).
Remove the vmdk from the VM.
Edit the .vmdk descriptor file in the command line and change back
ddb.adapterTypefrom "lsilogic"to"ide"Add for the final time the IDE vmdk to the VM.
With the disk expanded, proceed with these commands:
Power on the SIM.
When prompted, invoke the menu with
Ctrl+C.Select option 5
disk show(disks 0.16 0.17 and 0.18 are assigned for the system aggregate; all other 53 disks should be assigned later).haltPower cycle the simulator.
When prompted, press
Ctrl+Cfor the Boot Menu.Select option 4 and wait for the process to finish, which takes longer with more and larger higher capacity disks.
Configure the node management network as proposed.
Log in with the admin user and run
cluster setupSelect to create a new cluster that has a single node cluster, for simplicity.
When prompted, supply the base license in the text file downloaded with the simulator.
Now that the cluster node is running, assign all created disks to the node and configure a second aggregate to hold the data.
In the command line of the simulator, run these commands:Code Block language bash system show # to retrieve the node name, here dataontap-01 storage disk assign -all true -node dataontap-01 system node run -node dataontap-01 options disk.maint_center.spares_check off storage aggregate create -aggregate dataontap01_01 -diskcount 53 -nodes dataontap-01 -maxraidsize 28
...