| Excerpt | ||
|---|---|---|
| ||
UIC-353 epic; UIC-380, UIC-381, UIC-382 | CUP 610 |
...
For older Gateway versions, obtain the optional stand-alone package for video clipping and install it on Gateway servers with no additional configuration. In addition to the RPM tool, install the supporting framework for multimedia formats i.e. FFmpeg, which Swarm provides preconfigured within a Docker container.
| Info |
|---|
Best practice Use Docker and install the provided container; this selects the required FFmpeg repo choices, installs dependencies, and makes additional resource changes required to protect Gateway's performance. Installing FFmpeg directly requires additional configuration. It is advised to complete the configuration with DataCore Support. |
Copy the package for video clipping to a server that is running Content Gateway. See Gateway Requirements for more information about all the gateway server requirements.
caringo-videoclipping-VERSION.noarch.rpmIf the server is running Content Gateway 6.0 or earlier, upgrade Gateway (version 6.1 and higher support drop-in features such as video clipping). See Gateway Installation.
If Content UI is version 6.1 or earlier, upgrade it to support this feature. See Content UI Installation.
Install the package.
Code Block language bash yum install caringo-videoclipping-VERSION.noarch.rpm
The installation creates a “features.d” directory under
/etc/caringo/cloudgateway/where Gateway detects optional dynamic features.Install multimedia support via FFmpeg. Swarm provides it preconfigured in a Docker container.
From an Internet-connected machine,Check the Docker is installed.
Code Block language bash docker info
If the Docker is not installed, install the Docker package and start the daemon. Check the status and enable it system-wide. See docs.docker.com/install/linux/docker-ce/centos/ for more information.
Verify Docker by running a container test.
Code Block language bash docker run hello-world
Load the provided container for FFmpeg.
Code Block language bash docker load < caringo-gateway-VERSION.feature.ffmpeg.via.docker.VERSION.x86_64
Gateway creates
/var/spool/caringo/cloudgateway/featuresdirectory for spooling video clips. Gateway denies starting in absence of the directory.In setting
iptablesrules, Docker closes external TCP access to port 80 (although ping and ssh still work). Explicitly open port 80 again for clients to access Gateway.Code Block language bash firewall-cmd --add-port=80/tcp --permanent firewall-cmd --reload systemctl restart docker
Repeat the above process on any remaining Content Gateway servers.
Restart the Gateway server(s).
On reboot, Content Gateway detects the feature. On a page refresh, Content UI displays the clipping control for video content.
...
Notes
Currently, clipping is allowed for named objects. Only one clip can be saved at a time.
The browser-based tool requires an HTML5-supported video format; MPEG-4/MP4 (H.264) and WebM are tested and supported.
Video clips are output in MP4 format.
The Content UI adds the scissor  icon to the right of the video control bar on video-format objects with a sufficient number of frames to clip. Check the Gateway installation if the icon does not appear. Selecting the icon toggles the video clipping toolbar open and closed.
...
| Tip |
|---|
Tip For higher resolution, use Full Screen |

Three ways to set the time span of the clip. Select a method based on the precision needed:
Drag the green and red bars
Select a bar and use the left and right arrow keys to move it frame by frame (supported in Chrome)
Enter minute:second[:millisecond] values in the Start Time or End Time fields
The default format for Clip Name is {original-name}-{start}-{end}.{filetype} but it can be customized. The clip name dynamically reflects the selected start and end times unless the field contains a custom value. This becomes the object name after selecting Create Clip: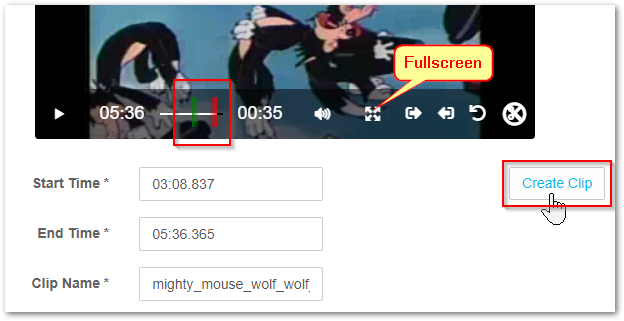
The tool writes the clip to the same bucket as the source video.
The following shows an example of a clip with the default name beside the original video.
| Tip |
|---|
Tips
|
...
Each video clipping event logs multiple operations to provide auditing through the process, which might take a long period. Gateway creates video clips asynchronously to accommodate requests of all sizes and acknowledges the request with an INVOKE message, which appears first in the audit log. The acknowledgment references the future JSON result object. The JSON result displays the outcome of the clipping request as Sucess or Fail, the FFmpeg exit code, and the duration, capturing the same information as if it is synchronous.
...